Peek under
a hot rod today and it's not uncommon to find an automatic overdrive resting between the
frame rails. These transmissions are affordable, durable, and easy to install.
With an overdrive transmission and 500 hp, fuel economy exceeding 20 mpg can be a
reality. But, before you install that new TH2004R or TH700R4 tranny in your early
hot rod, there are a few things you should know about how to make them work. Both
the 2004R and 700R4 use a lockup-style torque converter that requires 12 volts and a
pressure switch to lock up in Fourth gear. This eliminates the need for a manual
switch. When retrofitted into early muscle cars, these trannys require the pressure
switch to be changed and a few wires rerouted. Changing the switch and wiring can be
done in the car without a problem. If the switch is not changed and wired properly,
the converter will not lock up in fourth gear and possible trans and converter damage may
occur, not counting your gas mileage will suffer.
| PARTS NEEDED: Normally open/pressure closed switch - GM #8627332 Single-pin TH400 kick-down connector switch - GM #24205373 5 or 6 female spade connectors ? Normally open brake cancel switch - GM #25524845 (or junkyard donor truck) Low-vacuum switch - GM #14014519 Low-vacuum switch wiring harness - Junkyard donor truck or 2 slim female spade connectors #18 gauge wire ? Vacuum hose ? TH700R4 filter & gasket - Advance Auto Parts #FK171 (PROFormance Filter Kit) Dexron II transmission fluid (approx. 5 Qts.) Prices I paid for these parts as of 10/24/2000: (The GM parts listed are wholesale prices).
|
| In the
original CHP article that I read, they never mentioned the low-vacuum switch or brake
cancel switch. You need the low-vac switch so the converter will unlock in low
vacuum situations, such as going up hill and heavy throttle. The brake cancel switch
unlocks the TCC when the brakes are applied. Trucks that came stock with 700R4
trannys came with a low-vacuum switch and a brake cancel switch. The stock low-vac
switch didn't let the TCC unlock soon enough with this mod. I checked the vacuum on
the stock switch and it kicked in at 3.5", meaning the vacuum has to get real low
before it will unlock. The vacuum switch I recommend works real well as it kicks in
at 7.5", which will let it unlock sooner. The brake cancel switch on 700R4
equipped trucks also disconnects the cruise control (if equipped) when the brakes are
applied. Are you are doing this mod for one of the reasons I did, to get rid of some of the wiring and vacuum hoses that came on our trucks. When I removed the EGR bleed solenoid and related wiring, I had to rewire my 700R4. This is one of the reasons I did this. If your truck came with a 700R4 stock, the only parts you will need to buy are the normally open/closed pressure switch PN GM8627332, single pin TH400 kick-down connector switch PN GM24205373, and the low-vacuum switch PN GM14014519. |
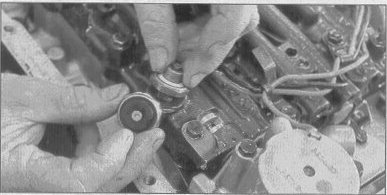 |
The factory installed a couple of different types of pressure switches depending on the application. You will want to install a normally open/pressure closed switch (PN GM8627332). After you have drained the fluid and removed the pan, you will also need to remove the filter. The pressure switch is located on the righthand side of the trans. When you install the switch, be careful to not over-tighten it. |
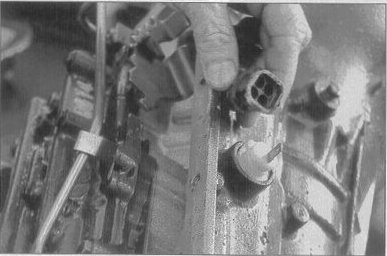 |
The next step is to replace the original four-pin connector on the driver side of the trans with a single-pin TH400 kick-down connector switch (PN GM24205373). |
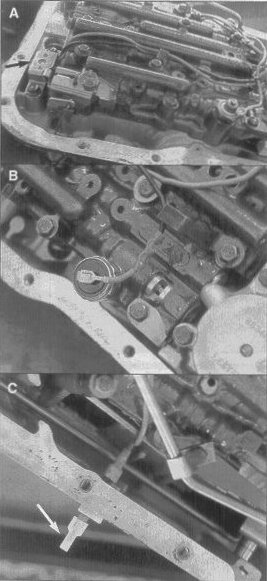  |
The last step is
wiring. Before you change any wiring, find the solenoid (arrow, photo A) and the two
wires connected to it. You will need to install a female spade connector on the end
of the black wire and run that wire to the new pressure switch (photo B). The red
wire from the solenoid will be run to the new single-pin connector (photo C). This
red wire will also require a female spade connector. With the wiring completed
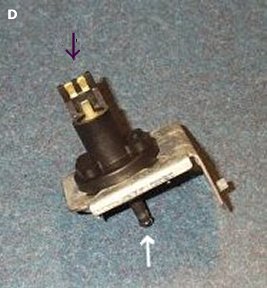
inside the transmission, install a new filter, the pan/gasket, and fluid. Now to the outside wiring. I recommend running an accessory hot wire (hot only when the key is on), through a normally open brake cancel switch. This switch will allow current flow, only when it is depressed. The brake pedal depresses the switch, normally, and releases the switch when the brake is applied. This switch works exactly opposite the brake light switch, whereas the brake light switch allows current, only when the brake pedal is depressed, the cancel switch interrupts current when the brake pedal is depressed, thereby unlocking the torque converter clutch, such as in a panic stop. The cancel switch is mounted on a bracket under the dash. The brake pedal arm makes contact with the switch when it is all the way out. Just so you will know, most of the time the brake cancel switch is also a cancel switch for the cruise control, if you have cruise. This is why it is called a cancel switch, it cancels power when the pedal is pressed. You need to make sure that when the brake pedal is all the way out there is power going through, press the pedal and the power is interrupted. From the brake cancel switch, power is routed through the low-vacuum switch (PN GM14014519, photo D). You see the two terminals that you need to hook to. These are slim so this is the reason I recommend to use a junkyard donor for the plug (black arrow, photo D). If you can't find a plug, you can either use some slim female spade connectors or solder the wires on. Mount the low-vac switch on the firewall beside the master cylinder, right by the plastic sleeve with all the vacuum hoses going through it. Then connect to the new single-pin connector at the transmission (arrow, photo C). For vacuum going to the low-vacuum switch you will need to use a manifold vacuum source. On my truck I have a TVS that controls vacuum going to the switch. It will not let any vacuum go to the switch until the engine coolant temp reaches 170 degrees. From the TVS or manifold vacuum source run a hose to the low-vacuum switch (white arrow, photo D). At the switch I have a delay valve at the hose end where it connects to the switch. This helps to delay vacuum loss at the switch. You don't really have to use the delay valve, but I already had it so why not? Now you can go and enjoy the ride! |
Update!
Since writing this article, I've had a lot of inquiries about it. The photos in the article are of a 2004R tranny. They both use the same principle to lock in 4th. They look different so it is confusing to some. These photos were taken from a Chevy High Performance magazine article, not by me, well except for the last one, photo D, which I did take. Also, there are many different variations of valve body's with several different types of pressure switches and wiring schemes. Early 700R4's locked in 3rd also. This is the reason they have so many pressure switches. My 89 model has only one. The 4/3 pressure switch. If you have the early type, you may have as many as 4 pressure switches, 1 beside the solenoid, and 3 at the rear. The pressure switch which needs to be changed is the center, rear one.
Now again, with so many different variations of these things, you may also have a single wire solenoid. If this is the case, instead of the GM #8627332 pressure switch listed above, which is what is needed for the two wire solenoid, you will need GM #8643710 pressure switch. It's around $4.00 at the GM dealer. To wire the single wire solenoid, go from the TH400 connector to the 8643710 pressure switch, then to the solenoid. I think this will work on any of them. I'm not 100% positive. I'm no tranny expert, but I believe this to be true. My 700R4 came from a 89 Chevy 1/2 ton pickup. It only had one pressure switch. It came with a two wire solenoid also. I changed my solenoid to a one wire type, GM #8654123, and used the GM #8643710 pressure switch. Either way works the same. There is no difference in the way it locks. I just happened to have a new one wire solenoid and was changing the fluid and decided to put it in. It didn't change a thing from the two wire one in the way it locks in 4th. If you do this mod, you change to the new pressure switch, depending on which type of solenoid you have, and leave the other switches in the valve body. Remove the old wiring, but save everything in case you want or need to put it back like it was.
Now, this is only a belief of mine. I have absolutely no proof, other than what I have seen. Early 700's locked in 3rd also. I know for sure this to be the case. Why, I don't know, but they did. I firmly believe this is one of the reasons early 700's died so quickly. People use these trucks to haul and tow. Not knowing any better, people would leave it in OD when doing this. So what happens is, it locks and unlocks, over and over again. This will kill them in hurry. It causes them to overheat, which is the number one killer of 700R4's. So, then they heard to leave it in drive (D) to keep it from doing this. This won't let it go into 4th of course, but the older ones still locked in 3rd (drive). So, in my mind, they are still locking and unlocking. Maybe not as much as being in OD, but I think they will still do it. I may be wrong, but so what, I've been wrong before. GM changed this sometime down the road. Not sure when exactly. My 89 isn't this way.
Again, just to let everyone know. I am no professional mechanic or tranny mechanic. I believe all things said to be true. They are to the best of my knowledge. I hope it all works for you.