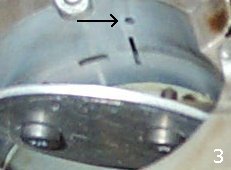
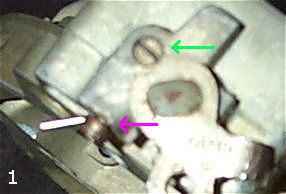
I used the articles by Damon on Peformance Tune Your Secondaries, Q-jet Secondaries Part 2, and Q-jet Idle Problems, to help with the tuning of my Edelbrock #1904 Q-jet. The first thing I did was to check the choke pull off/AV damper and see how fast it opened. Well as it turned out it opened real close to one second. Great. The air valves already opened fully also. Next I pulled the sec. metering rods and hanger to see what I had. Edelbrock says on their site the 1904 comes with DR rods. I wanted to make sure. It turns out it was a M hanger, along with the DR rods. I pulled the carb off of the engine to make sure I set the AV spring tension right. Damon recommends to use a B to G hanger. I happened to have an E hanger laying around so I used it and set the tension to zero plus 1/8 of a turn just to be on the safe side. This E hanger was old and a little worn but worked great. I have since replaced it with a new Edelbrock G hanger. No further adjustments had to be made with the change. I found out any hanger from B to G will work just fine. I have read where people say on the primary side, the primary rods need to be around .030 smaller than the main jets, but this recommendation is for pre-75 Q-jets, without the APT feature. The Edelbrock 1904 Q-jet came with .050 rods and .073 jets. As you see this is a difference of only .023. I was having problems with the exhaust being so hot it was killing my catalytic converter and muffler. After a lot of tuning and guess work I came up with a good combination of a cooler exhaust and good emissions. I kept the 73 jets and installed a set of .048 primary rods and kept the factory setting on the APT at 2 turns out. This stopped the lean condition I was having in the cruise range causing the hot exhaust. I tried a setting of the same jets and primary rods, with the APT set at 2-1/2 turns out. This seemed to work fairly well in cool weather, but as soon as it started warming up, I started having problems. The hotter the weather got, the worst my stumbles got. It would load up while sitting at a light. I went back to the factory setting of 2, and all is fine in truck land once again. By the way, 1975 and later Q-jets used different primary rods than 74' and earlier Q-jets. The 75' and later Q-jets use part numbers that start with 170 (74' and earlier ones start with 70). The part numbers for 75' and later primary rods start with 170513xx, as in the .048 rods I used would be 17051348. The last two numbers are the size of the rods. The APT (Adjustable Part Throttle) that the Edelbrock Q-jets have is set at 2 turns out from the factory. What the APT does is control how far the primary rods can be pulled down in jets. The power piston has a pin made on it that hits the APT screw and stops it from going any farther down into the jets. The farther out you turn the APT screw, the farther out of the jets the rods will stay and the richer it will run. It is sort of like installing bigger jets because primary rods get smaller the farther up they are held. What you are trying to do here is get a part throttle that is crisp and responsive, without any surging or hesitation. This is not for performance, that is accomplished with the secondary side. You don't want to go too far with this adjustment, because it will just waste gas. Also, if you must pass emissions testing, be real careful. This will increase your emission levels. There is a way to adjust the APT without
having to remove the top of the carb every time. If you look at the air horn just in
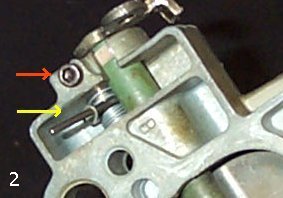
front of the choke tower where the air cleaner gasket sits, you will see an aluminum
plug. To get the plug out you will need to remove the air horn. Once the air
horn is off you can knock the plug out from the inside. In order to plug the hole
and be able to get to the APT once the air horn is back on the carb, I tapped the hole for
a 3/8" x 24 thread allen head plug. This will sit flush with the air horn and
not interfere with the air cleaner. Don't tap all the way to the bottom of the hole,
you won't the plug to sit flush, so check the depth as you are tapping the hole.
Also, you will need to make a tool to fit the APT screw. It needs to be sort of
rectangular in shape. I used a piece of 5/16" steel gas line. Just use a
pair of pliers to squeeze it into an oval shape, then use a screwdriver to finish shaping
it into a rectangle. Test fit until it fits without too much loose motion. You
may have to grind down the outside of the piece to fit in the space around the adjustment
screw.
My Comments On This Mod I have run Quadrajets on my cars and trucks for most of the time I have been driving. I have never had one perform like this one does. As Damon says , "It will hit like it has fuel injection". I highly recommend trying this mod to your truck. I guarantee you will love it as much as I do. It is the best thing I have done to my carb and the cheapest. My total cost of the above mod, $2.00 for the Edelbrock G hanger. Well, let me change that, I did have to buy the carb in the first place, but that don't count. BTW! The Q-jets that came on the L-69 engines (305 HO's that came in early 80's Camaros and Firebirds, along with Monte Carlo SS's) came stock with M hangers and DR rods, most of them anyway. The LG4 engines (basic 305's) had P hangers and DP rods. If you try to find these rods in a junkyard look for these cars for the best chance of finding them. The part numbers for DR rods is GM17053659. The GM dealer is the only place (besides a junkyard) that you are likely to find these at. They are not cheap, $8.40 each is the price I got from the dealer in my area. On the hangers, the best place I have found is to buy the Edelbrock ones. You can get these at Jeg's and Summit and other places on the net. The part numbers for the Edelbrock hangers are as follows: B hanger #1960, G hanger #1961, K hanger #1962. They have more but these are not worth mentioning. If anyone needs more info on rods and hangers, as to what all this means, or what size are the metering rods they have, I have all this info if you need it. A good book that everyone who has a Q-jet should have is Doug Roe's Rochester Carburetors. This is The Bible for Rochester carbs, hands down. I can't stress this enough, if you want more performance out of your Q-jet or just want a great how to rebuild reference, buy this book. It is an invaluable piece of information that you shouldn't pass up. I know that a lot of this will make no sense to you because it didn't to me at one time. I had no idea that you could make a Q-jet perform this much better than stock. As you can tell, I love Q-jet's, it has got to be one of the best, if not the best carb ever built for the street. When properly tuned it will give you many years of great performance and economy. Now start adjusting.
|