 2.
2. 3.
3. 4.
4.
5.
 6.
6. 7.
7.
8.
 9.
9. 10.
10. 11.
11. 12.
12.
13.
 14.
14. 15.
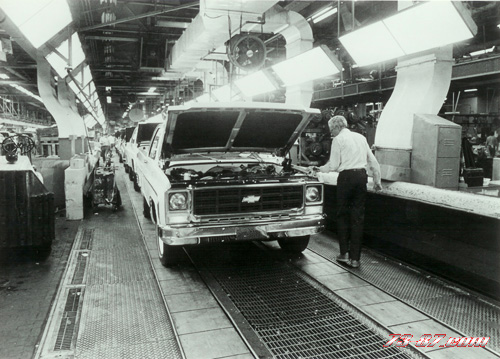
15.
16.
 17.
17.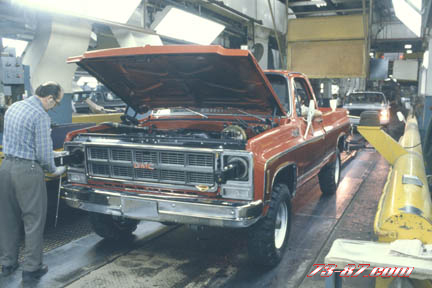 18.
18. 19.
19.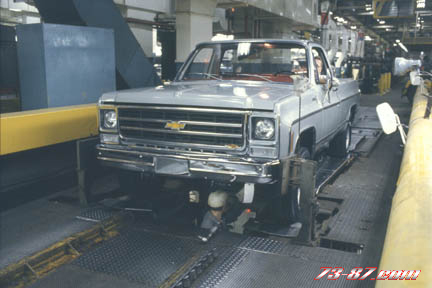 20.
20.
21.

|
Assembly Line Photos |
Here are some photographs taken from a GM assembly line during the late 1970's. As you can see, things were done quite differently back then compared to today's assembly lines! Click on the thumbnails below to view the full size image.
This images were sent to me by General Motors Corporation, and are property of 73-87.com. These are for your viewing pleasure, do not copy or alter them in any way, shape, or form.
1.
2.
3.
4.
5.
6.
7.
8.
9.
10.
11.
12.
13.
14.
15.
16.
17.
18.
19.
20.
21.
Photo narration below courtesy of Keith Seymore, Chevrolet Flint Assembly Line Supervisor from 1979-1986 and GM Full Size Truck Engineering from 1986-2009. Keith is a great guy with a ton of cool and useful information. Thanks for your terrific contribution to this page Keith!
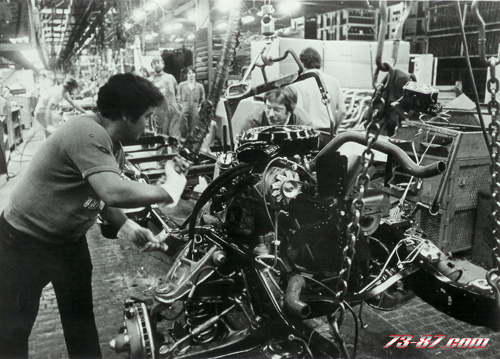
Photo 1: Line 1
motor set (b&w). You can tell it's Line 1 (the pickup line) because of
the V6 engine, which was not available in Blazer/Suburban, and because of
the side-saddle fuel tank (also unique to pickup). This was a very
"physically intense" and critical job, so you wanted some strong boys who
were willing to show up every day for that job. You can see racks and
racks of various material in the background; also note the brake master
cylinder which is "slaved" in an upright position. The brakes were
already evacuated, filled and tested by this point.
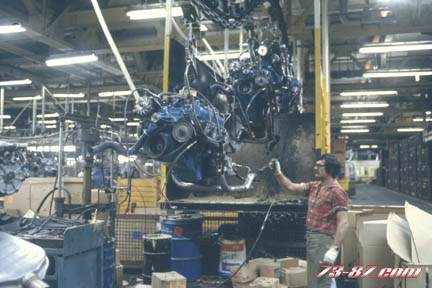
Photo 2: Line 1 motor set (color). Looks like a similar photo of the
same location, but from the other side of the line. The yellow "chute"
in the upper left is where the engines would come down from the overhead
accumulator fed by the "motor line".
Photo 3: Motor line (color). This is not the start of the motor line
but a location where the engines are coming down after crossing an aisle.
The motors arrive in racks, with just the base engine present. After
choosing the appropriate engine, the operator hangs it on the conveyor where
the transmission, accessory drive, exhaust take downs, air cleaner, etc are
installed as required. I don't recall for sure if carburetors/TBI
units were already installed, but I do recall that spark plugs and wires
were on there as received.
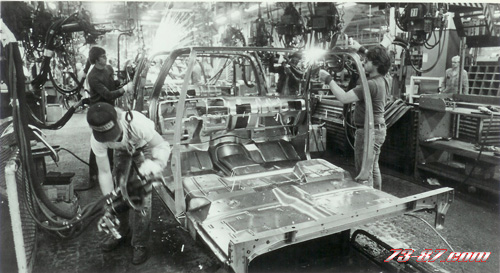
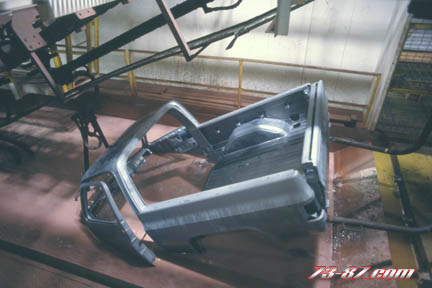
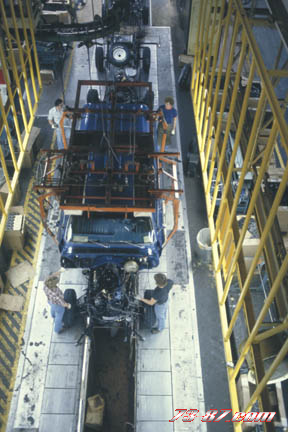
Photo 4: Frame line (color). You'll notice at this stage the frames
are moving sideways (toward the camera). I should mention frames were
received as individual side rails and cross-members and then riveted
together (on a "pedestal") as required. Some of you might remember Ben
Hamper, the author known as "The Rivethead". This is the area that he worked
in. After the frame is squared up it is hung on the chains that you
see, upside down, to facilitate the installation of the front and rear
suspension and axles. After those are installed it is rolled over,
using a chain hoist (you want to give that operation some space, because the
frames will dance around a bit when they slam over) and work on the topside
progresses. You might notice in these pictures that the drive shaft is
already installed and is supported at the front by a bungee cord. The
operator will guide the shaft into the end of the trans at motor set.
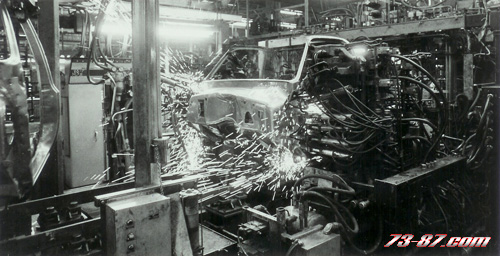
Photos 5, 6 & 7 (body shop). This is the "Line 2" body shop (Blazer, Suburban), located at the north end of the plant on the second floor. You can tell, not only because of the cab floor as shown, but because Line 2 was a very "manual" operation. Material was clamped in place in these big fixtures and then the individual operators would reach in there with their weld guns and hit the individual spots. They got very good at making the sparks fly in any direction at will and could easily melt holes in your stylish polyester pants or cardigan sweaters (lol). The Line 1 cab shop, by comparison, was highly automated. Formed sheets of steel (fabricated individual parts) were fed into one end and finished, completed pickup cabs popped out the other. Cabs were built at over 70 jobs per hour (to feed the main/final line, which typically ran at 60 jobs per hour - that's one complete truck every minute). I should mention Line 2 was much slower, at 30 - 36 jobs per hour, and at a ratio of 1 Blazer followed by 2 Suburbans. The Line 1 cab shop was located at the extreme south end of the plant, on the first floor, and had an "accumulator", or body bank, which could allow the paint and trim lines to run up to 8 hours in the event of a shut down in the cab shop (which was often).
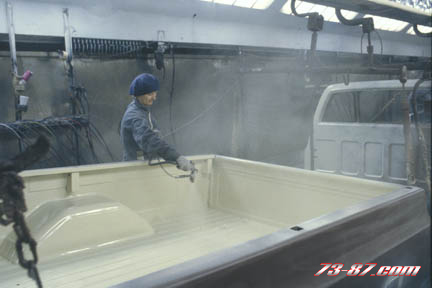
Photo 8: The ELPO dip tank. This was a
revolutionary painting process (at the time) where the entire vehicle was
"dipped" in the primer paint. The vehicle itself was electrically
charged, which opens the pores of the metal, allowing the paint to seep in.
The charge is then cut off, closing the pores and the paint is trapped.
The excess is literally rinsed off (with water) once the vehicle emerges
from the tank, resulting in a smooth finish and excellent coverage. I
remember the process was fairly new when I started so it was probably
installed in the mid to late 70's (on line 2 first, then line 1 later).
The ELPO process is still in use today. In the Mishawaka (H2) plant the
vehicle is actually "tumbled", end over end, in the tank to ensure all air
bubbles are evacuated.
Picture 10: You can see the operator spraying a little bit of "Ziebart" type
rust proofing inside the door.
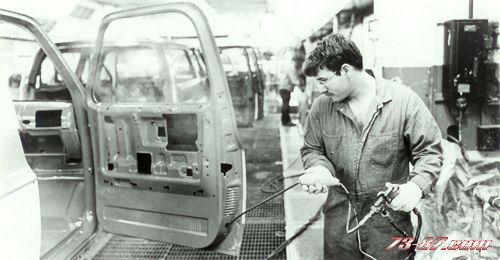
Photos 11 & 12: Paint shop. Nothing too revolutionary in this
particular picture but it does make me think of a couple things. A) In
this picture you can see the operator is spraying with a conventional spray
gun. Sounds impressive but the reality is this guy could have been
sweeping the floors the day before; today he is handed a spray gun and
within three or four trucks he is "painting". In an attempt to
modernize we actually installed an automated "turbine bell" system (Behr was
the manufacturer), whereby a small cone (like a showerhead) is spun at a
very high speed (ie, 20,000 rpm) and the paint is "slung" onto the vehicle.
Here again, the vehicle was electrically charged, drawing the paint to the
metal (you could actually see the paint turning the corners to stick on the
backside) reducing overspray and waste. The only problem was that for
any metallic paints it took the metal flakes and lined them all up neatly in
order, changing the overall perceived color. We had to go back with a
traditional reciprocating sprayer and apply a light color coat on those
particular trucks to get the paint to match the standard chip. B) You
can't really see it, but in the background of those spray booths there is a
"waterfall", that is, water running down the sides of the booths in sheets.
The vacuum from the falling water captures the overspray, rinsing it into a
holding tank where it is dried and the resulting "sludge" is disposed of;
presumably in a manner befitting a hazardous waste. C) Something else
you all might not know, but which I found clever: for two tone trucks, the
secondary color was actually applied first. The desired pattern
(whether the inset or lower body - ZY1 = solid paint and ZY2 - ZY8 were the
two tones) is then covered up with butcher paper and tape and then the
primary color is applied over that. The paper is removed and VIOLA you
have your two tone. Incidentally, some of you may remember the ZY7 paint
scheme, where the secondary color formed a "spear" above the feature line
with then curved upward at the cab back and over the roof - this paint
scheme was conceived and developed by a couple "mechanics" (ie, technicians)
at the Milford Proving Ground and subsequently adopted for production.
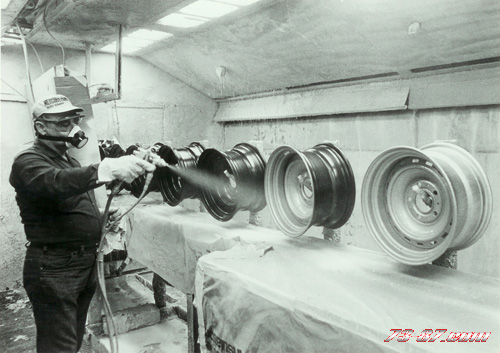
D) Lastly, you can see that wheels were received in black primer and the
appropriate color (white or argent silver) was sprayed on the show surface,
with no masking and allowing the overspray to flow through any openings or
slots. (That's a big deal to the Corvette and/or Pontiac enthusiasts).
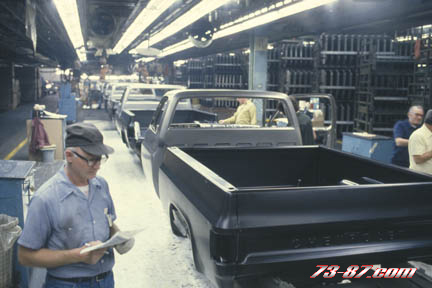
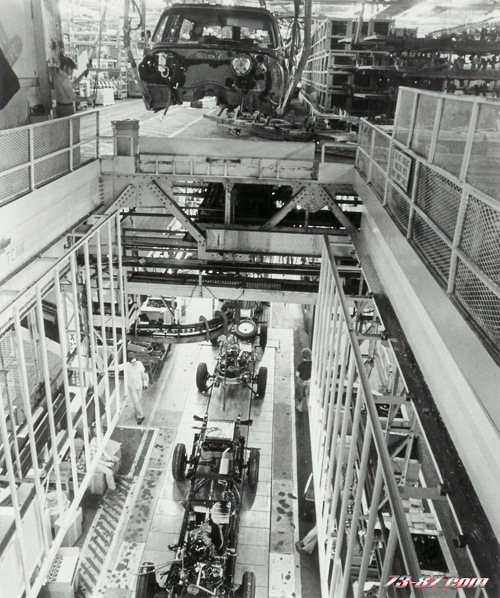
Photos 13, 14 & 15: Body drop. This was the most dramatic of assembly
operations (...tour groups would stand and watch this for as long as you
would let them). The bodies came down through an opening in the second
floor which, with the high ceilings of an assembly plant, was a LONG way.
A good hoist operator would let the body essentially "free fall", flying
down through the floor WHOOOSH and then EEEEEK stopping just inches off the
chassis. The guys on the first floor would nonchalantly install their
body mounts and gently guide the cab/box onto the chassis, as though they
did it every day (...which, of course, they did). Body bolts and box bolts
were tightened (hopefully not cross-threaded, which happened relatively
often) and the truck sent on its way, all without ever stopping the line.
I should mention the line (almost) NEVER stopped. Wrong cabs, wrong
tire/wheel assemblies, heart attacks, lack of manpower, material shortages,
etc, were NOT enough to stop the line. During my time on the final
line I honestly don't recall that I ever personally pushed the stop button.
I did, a couple times, on the chassis line in the brake area when the
tooling was stretched against it's air hose and to let it go would have
pulled the hose off its coupling. Other than that it was very, very
rare. I also recall that the line rate was slightly faster than what
was reported to central office so that, on a good day, we could actually
produce more than the required number of trucks, resulting in a few "free"
vehicles. The only times I remember the line stopping were due to
downages in the cab shop, whereby the downstream operations ran out of
bodies, and we had a tornado (once) and hung out in the basement.
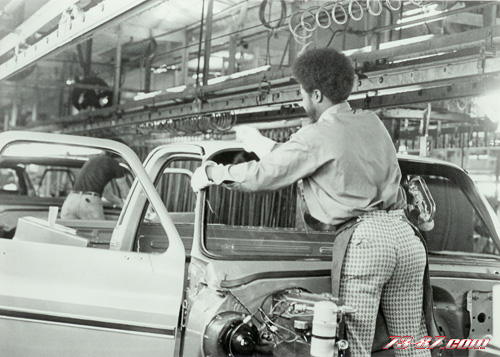
Photo16: Back to the trim area, so they are skipping around a bit.
Body glass and all the interior trim were installed in Trim, which for Line1
pickups was on the first floor at the south end of the building (so vehicles
started with the cab shop, south end first floor, went to the second floor
for paint, then back downstairs for trim, then back up to the second floor
for the accumulator (body bank) and in preparation for body drop).
Most of the cute ladies, if there were any, worked in Trim (and usually had
a number of extra male workers hovering around).
Photos 17,
18, 19 & 20: Final line, showing headlight aim, wheel alignment and the
final mainline inspection. Those headlight aimers are a mechanical device
which attach to the headlamp lens with a suction cup; a small bubble level
is used to adjust up/down and there is an arrangement of mirrors which set
the adjustment crosscar. Typically during wheel alignment, while the
man in the pit is setting the toe adjustment, the driver is busy cycling all
the lights, turn signals, making sure the radio works, trying the windshield
washers, etc. The vehicle engine is running during these tests so the
short "walls" on either side of the line are comprised of vacuum vents which
suck out the exhaust fumes. I should mention that a number of
employees were required to move all the vehicles around: not only to drive
them off the end of the line (usually done by regular workers assigned to
that job) but also a whole "subculture" of volunteer drivers used to shuttle
vehicles back and forth to the repair and shipping areas. This was
usually done by extra "utility" workers who did not have an assignment on
the line for that day, by "rehab" workers who might be temporarily disabled
but could drive a vehicle, and by any other derelicts and hot-n-tots that
could be rounded up. This activity usually continued long after the
main line had stopped and, as a source of overtime income, was a popular job
for those who showed some initiative for extra income ( that is, the guys
that were over-extended because they bought too many boats, snowmobiles,
motorcycles, etc).
Last picture, picture 21: there she is, the diamond of the Flint night sky,
Chevrolet Flint Assembly, complete with that familiar red and white
checkerboard water tower. At one point this was the only plant in the
world producing GM Full Size Utility vehicles (back before they were known
as "SUVs") and is still producing Light Duty pickups and Medium Duty trucks.
The plant can be viewed from two major expressways, bordered by I-75 (to the
west; running north/south) and I-69 (to the north; running east/west).
My off hours activities would often take me past the plant, allowing me to
smell the distinctive ELPO fumes and causing a short lived mild depression
(they still have that affect). I am reminded that those stacks also
emitted small globules of paint, which would stick to your vehicle in the
form of small black blobs. Many people would simply have their
vehicles wheeled out every year or two (which after a particularly noxious
spill GM would pay for); I elected to cover my little blue stepside with a
car cover thereby short circuiting that process.